articles/Close Up/waterdropphotography-page1
Water-drop Photography - part 1 of 1 2 3 4
by Christopher Algar Published 01/04/2017

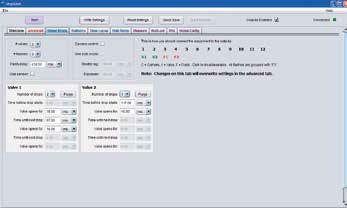
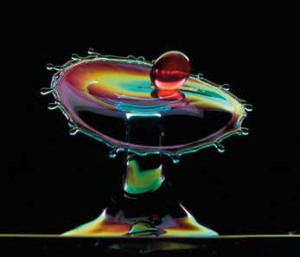
This is a screenshot of Stopshot software showing the settings used to take the accompanying photograph. Two valves were used, with the first controlling blue-dyed water, and the second controlling the red drop seen just landing on the first splash.
One of the joys of photography for me is revealing detail that is not visible to the naked eye. In macro photography, the magnification reveals normally unseen features of insects and other invertebrates, whereas high-speed photography can freeze the effects of colliding water-drops. After seeing a few waterdrop images, I could not resist the challenge of taking some of my own, especially as I am attracted to the technical aspects of photography.
My water-drop photography began after I bought a StopShot Studio 3 Valve Water-drop Kit from Cognisys. The Stopshot Studio Controller plugs into a computer and all adjustments can be made in the panel that appears on the computer screen. The Stopshot panel offers comprehensive control over the timing of water-drops, the number of valves used and the length of time they are open, and the delay before the flashes fire. Although the camera can also be plugged in and controlled from the panel, I just open and close the shutter manually. I made a simple wooden frame to support the water-drop reservoirs and electronic water valves.

A black background was used and the lighting was controlled by a muticolour reflector. The camera was set up with the lens level with the surface of the water in a glass tumbler.
All my experience with water-drop photography is based on electronic timing rather any type of manual method of drop release. I am therefore not in a position to compare the two methods. Although the electronic method allows some degree of repeatability between one shot and the next when using the same settings, there is noticeable variation when more than one drop is used. The upside of this is that taking a number of shots at the same settings will result in somewhat different images. On the downside, it can make it more difficult to achieve a particular effect.
Although I was eager to get some spectacular results from my new equipment, it soon became obvious that I needed to adopt a systematic approach when learning how to photograph water-drops. Using highspeed video, it would be possible to track water-drop collisions and see exactly what was occurring throughout the process. Being limited to a single frame per collision, however, I had to deduce what occurred before and after a shot in order to make beneficial timing adjustments. I found I could only gain the experience necessary to make such adjustments by starting with the simplest scenario of a single water-drop and taking photographs at various timing delays. This enabled me to build up a picture of how the drop made a hollow in the water and then rebounded to form a column, etc. The next step was to add another drop from the same nozzle and adjust the timing to find out how the collision spread out.
You are currently on page 1
- Water-drop Photography page 1
- Water-drop Photography page 2
- Water-drop Photography page 3
- Water-drop Photography page 4
1st Published 01/04/2017
last update 18/07/2022 16:31:50
More Close Up Articles
There are 37 days to get ready for The Societies of Photographers Convention and Trade Show at The Novotel London West, Hammersmith ...
which starts on Wednesday 17th January 2024


